How to use Meta Business Suite: From setup to advanced strategies
Step-by-step Meta Business Suite tutorial that highlights key features and tips to maximize benefits, and an in-depth analytics alternative.


If you are a creator or a brand, you likely have accounts on both Instagram and Facebook. Instead of managing them in silos, what if you could manage them on one platform? And for free!
That’s Meta Business Suite for you. It’s a one-stop platform for effortlessly managing content, marketing, and advertising efforts on Instagram and Facebook.
Wondering how to use Meta Business Suite for your business? This article walks you through the step-by-step process, explores its key features, shares tips to maximize its benefits, and even suggests alternative tools if you need more advanced analytics or functionalities.
What is Meta Business Suite?
Meta Business Suite is a social media management tool that allows Meta users to manage Facebook and Instagram. It allows tracking and managing content, communications, ads, and content performance in one place.
You might have heard of it earlier as Facebook Business Suite. In 2020, it was later rebranded to Meta Business Suite to reflect the company’s broader ambitions beyond social media.
It also now integrates WhatsApp Business apart from Facebook and Instagram.
To give you a little preview of what you can do with it, you can:
- Use templates to create posts, stories, reels, and ads
- Publish/schedule feed posts and stories without switching accounts
- Read and reply to messages and comments across three platforms
- Track insights and trends, and know more about your audience on Facebook and Instagram
- Create a to-do list of notifications to manage
- Create, track, and manage ad campaigns
While Meta Business Manager allows you more control over your business settings and security, Business Suite has one breakthrough advantage — you can toggle easily between accounts instead of having different accounts in different tabs.
This makes content planning, scheduling, communicating, and tracking easier.
Getting started with Meta Business Suite
Walk with us through the basic steps of using Facebook Meta Business Suite by connecting your accounts.
Requirements before setup
Before you start using Business Suite, make sure you meet these key requirements.
Business accounts on platforms
- You must have an existing business account on Facebook and/or Instagram
- If you don’t have a business account yet, you can convert your personal account or create a new Facebook page and link it to an Instagram Business or Creator account.
Page ownership requirements
- To access and manage a Facebook Page or Instagram account through Meta Business Suite, you must be the owner or give them full admin access.
- If you don’t want to give multiple people full access, you can choose to give them partial access (task access).
- If your page is already linked to an Instagram account, you should add it to your business portfolio for Business Suite.
Device compatibility
- Meta Business Suite is available on both desktop and mobile. The web version can be accessed through this link on PCs or laptops. Or you can download the mobile app for iOS or Android to manage content and messages on the go.
Access options
Let’s run through the step-by-step process of setting up your Facebook Business Suite through desktop and mobile.
Desktop setup process
- Log in to your account on the Meta Business Suite page
- If you don’t have an existing page, you will be prompted to create a business page next. Click on “Create a business page tab”

- Follow the onscreen steps and fill in all the required details.

- Link your account. However, in many cases, Meta automatically associates your Facebook Business Page with your Meta Business Suite account, so manual setup may not be necessary.
Mobile app installation and setup
- Go to the App Store (iOS) or Google Play Store (Android). Search for Meta Business Suite and download the app.
- Open the app and log in using your Facebook business account credentials
- If you already own a Facebook page, it will show up on the home page.
When to use a browser vs. when to use a mobile app for Facebook Business Suite?
- The browser version provides more detailed controls for handling multiple pages and accounts. Use it when you need to access in-depth features, analytics, or bulk content scheduling.
- The mobile version is perfect for making on-the-go changes. For example, monitoring notifications, replying to urgent messages, and managing ads on a small scale.
Configure your Facebook Business Suite
Now that we have the basics covered, let’s finish the final setup.
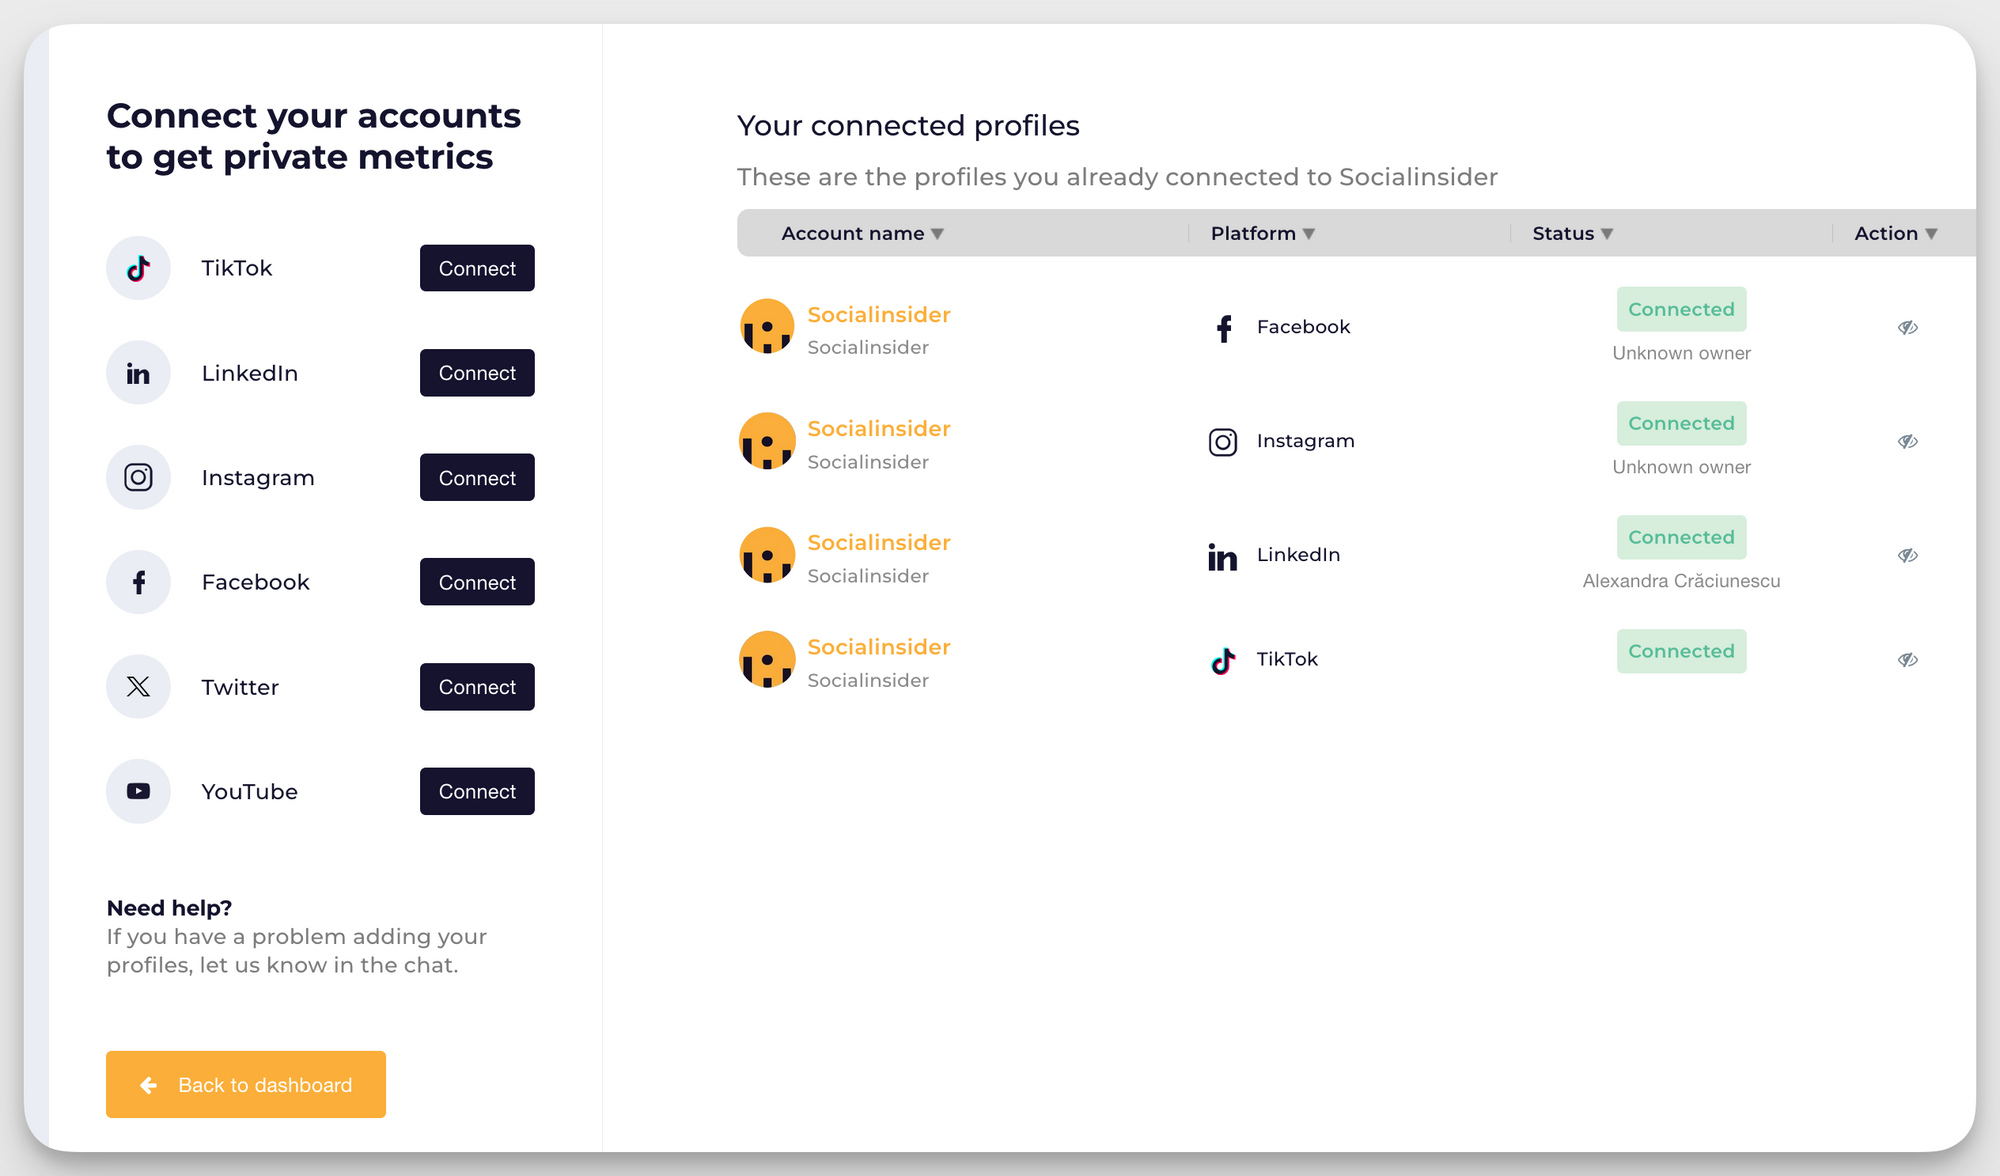
Connect your Instagram account
Once you have connected your Facebook page, connect your Instagram account as well.
- In the desktop app, go to Settings from the left sidebar
- Find “Connect Assets” to connect your Instagram account

- A new window will open, asking you to enter your Instagram username and password. If you don’t see the account you want to connect to, tap “Switch Accounts” and enter your details.
- Click “Continue” to finalize your business portfolio

Set up permissions and user roles
Invite your team to work with you and manage things. Go to the Settings tab in the left sidebar and click on the Users section.
To invite people, find the option in the top right corner.

Enter their email address, and you will be asked to assign the person partial access or full control.
In case of partial access, assign business assets/things they can modify or conduct.

Once everything is finalized, click on “Send invitation”.
If you have already added people, you can change permissions or user roles by going to the “Edit business portfolio permissions” next to their name.

Make your changes and click on “Save”.
Navigate the dashboard
Here’s an overview of what lies in your Business Suite dashboard.
- Home page: Get an overview of your business, including recent posts, performance insights, and quick actions.
- Adverts Manager: Access Meta Ads Manager for advanced campaign settings, audience targeting, budgeting, and performance tracking.
- Notifications: View all recent interactions, including comments, likes, and messages from your Facebook and Instagram accounts.
- Inbox: Manage messages, comments, and reviews from Facebook, Instagram, and WhatsApp in one unified inbox.
- Content: Create, schedule, and manage posts and stories for both Facebook and Instagram.
- Planner: Shows a calendar view of scheduled posts, stories, and ads to help organize your content strategy.
- Ads: Manage ad campaigns, set budgets, choose audiences, and create new ads to enhance your marketing strategy.
- Insights: Analyze performance metrics like reach, engagement, and audience growth for posts, stories, and ads.
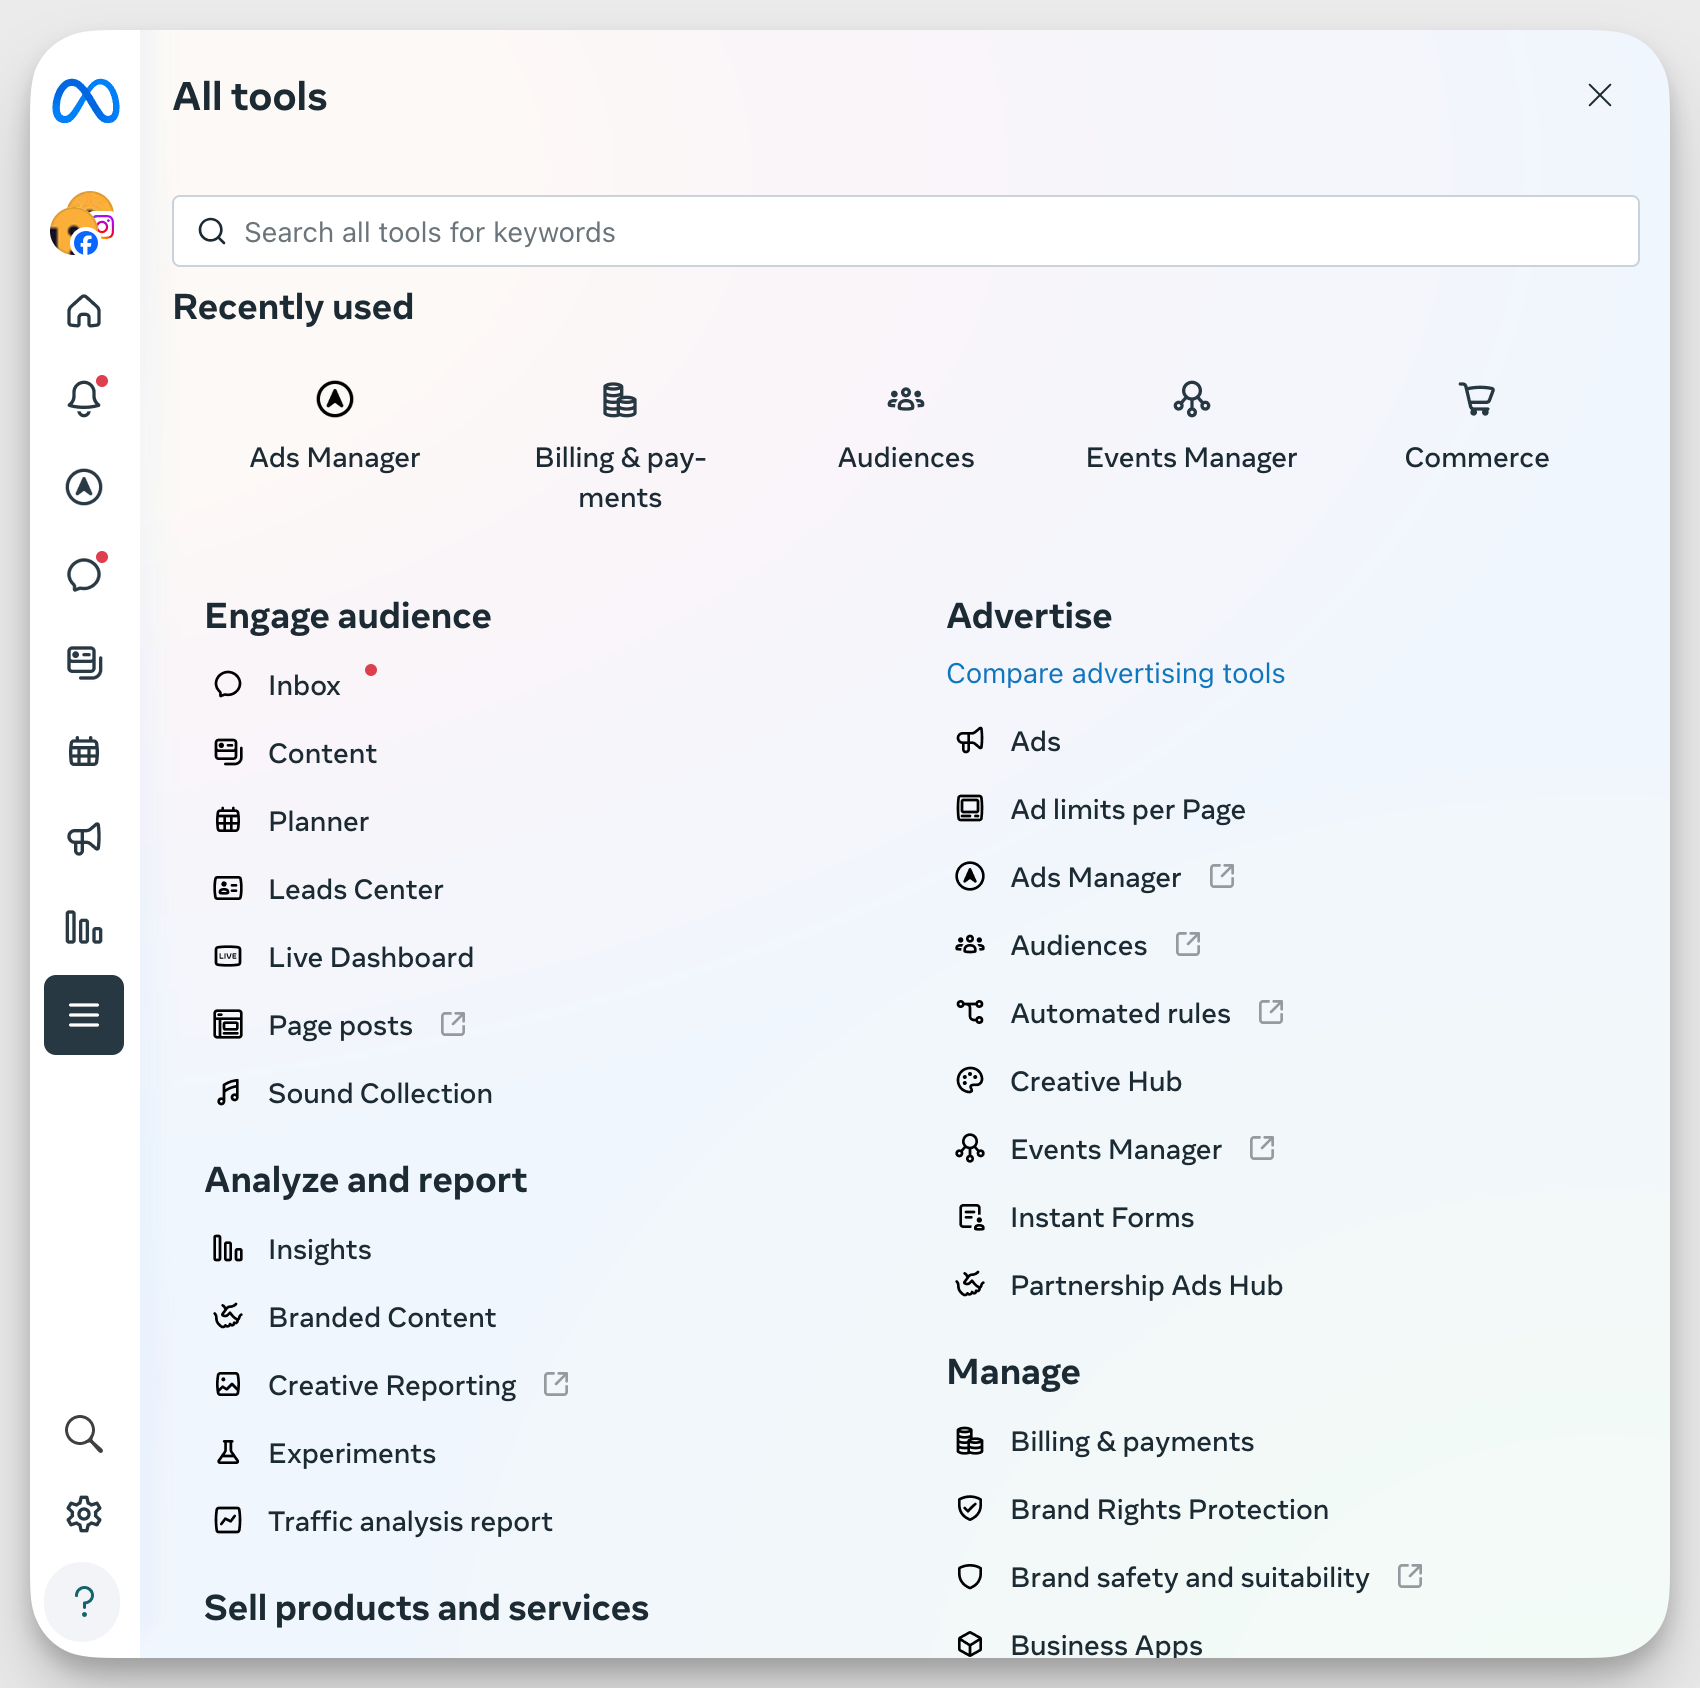
- All tools: Access additional features like page settings, roles, appointments, and monetization.

Customize your experience
Want to customize your dashboard and how your sidebar menu looks?
Go to the “Edit” button on the sidebar, and you can select up to 10 tools to display on your menu.

Essential features for beginners
If you’re starting out, we would recommend getting acquainted with these three features first.
Content creation and scheduling
Still not sure if you want to subscribe to a tool that helps create content? We suggest checking out the free content creation and scheduling features of Meta Business Suite.
Create posts for multiple platforms
- Create a post by clicking any of these three different areas on your dashboard — Home, Content, or Planner.


- Tap “Create Post”
- Choose whether you want to share the content on Facebook, Instagram, or both.
- Add details to your post, like image, caption, tags, and location.
- Edit your media using the built-in features

- Once your post is finalized, click “Schedule,” “Publish,” or “Finish later.”
You can follow the same process for creating Reels and Stories.
Upload images and videos to your content library
Want to create a library for all your image and video content? One where everything stays organized, is available for quick use, and can be easily modified.
Enter Meta Business Suite’s File Manager.
Look at how I have different folders where I store my videos and images. I can ensure my team uses the right assets for our social content.

To do this,
- Click on All Tools → File Manager from the left menu.
- Click Upload and select images or videos from your computer.
- Organize files into folders to keep everything structured.
- Use the built-in editor to crop, resize, or enhance images
- When creating a new post, click Add Photo/Video and select media from File Manager instead of re-uploading.
Schedule content
Whether you’re creating a story, post, or reel, you can schedule it for later. But how do you use Meta Business Suite to schedule posts?
Start by setting different times for Instagram and Facebook.

By selecting the “Active times” option, you can schedule your post for the times when your audience is most active.
Then view and manage these scheduled posts in your Content Planner.

Inbox management
Does replying to messages take a lot of your time? Do you wish you could block 30 minutes every day, open one platform, and reply to everyone? With a unified inbox, Meta Business Suite makes it possible.

That’s not all. Three other features that will win your team over:
- You can set up automated replies. For example, whenever someone asks for your contact information, the pre-set automation can share your number or location instantly. You can even set replies for frequently asked questions.

- You can respond to comments on Facebook and Instagram through your inbox and even mark some comments to follow up with later.
- View customer information like name, photo, and location directly from your Inbox. Add labels, contact details, and private notes to organize information and make future interactions smoother. For example, a customer messages your business with a product inquiry. From the Inbox, you see their details and add a label like “New Lead.” You also noticed: “Asked about pricing; follow up in three days.” This helps your team be on the same page when it comes to future interactions.

Basic analytics
Meta Business Suite’s analytics let you understand the results of your organic and paid social media efforts across Facebook and Instagram in one place.
Go to the Insights section through the menu on the left, and you will come across this page.

Let’s first look at the key metrics available on this platform.
- Views: Total number of times your videos, stories, or posts were watched.
- Reach: Number of unique users who saw your content.
- Follows: Number of new followers gained over time.
- Net interactions: Total engagement across all posts, including reactions, shares, and comments.
- Link clicks: Number of times users clicked on links in posts or ads.
- Individual post performance: Engagement, reach, and impressions for each post.
- Messaging performance: Response rate, average reply time, and customer interactions via Messenger, Instagram, and WhatsApp.
- Ad performance: Click-through rate (CTR), conversion rate, and ad spend.
Understanding audience insights
One of the most interesting metrics available is audience metrics. It breaks down your audience for both platforms and gives you insights into:
- Age and gender
- Top towns/cities
- Top countries
In the Audience Trends section, you can even see your audience’s most active times, the percentage of engaged followers, and returning viewers.
That’s not all. The potential audience section shows you the estimated audience size if you run an ad, the top locations you can target, and the top pages liked by your audience.

Decoding engagement metrics
In the Content tab of Insights, you can see an overview of how all your content is performing.

You can also see the top content by views, top content formats, and interactions on your posts.
These engagement metrics can give you an idea of the format and topics you can target moving forward.
If you are looking for more detailed insights, Socialinsider analytics dashboard should be your go-to option.
Facebook Analytics Dashboard
Get premium Facebook analytics to track performance, analyze content, and compare your Facebook metrics against competitors.
Start your 14-day free trialIntermediate features and strategies
Now that we’ve covered the basics, let’s explore the platform’s more advanced features to maximize its potential.
Cross-platform content management
Many brands end up sharing the same content on both Instagram and Facebook. But there are often minor variations in these posts. Meta Business Suite helps you seamlessly manage these cross-platform variations.
Creating platform-specific content variations
When you’re creating a post or reel in Meta Business Suite, you can set the following variations:
- Customise posts for Instagram and Facebook by toggling the “Customise post” option in the Post Details section of the Content tab.

- While writing the text for Facebook, you can input a feeling/activity, location, and button to DM directly on Messenger and WhatsApp. For Instagram, you just get the option to add the location.
- When you add hashtags, you can see the popular ones for Instagram and Facebook, respectively.
Once done, you can see how your post looks on Instagram and Facebook, on desktop and mobile.

Use Content Planner
Meta Business’ in-built planner is great for creating content with your team.

To use it:
- Go to the Planner tab in your left menu
- Click on the + icon on the day when you want to add content. Choose from post, story, reel, or ad
- Enter basic details about the content and tap Finish later
- Notify your team to finalize the details before it goes live
Content performance analysis
If you want to analyze individual content or a group of content pieces, go to Content in Insights tab and select the time period.
View metrics like reach, impressions, interactions, and link clicks. You can even sort content by your choice of metrics to find top-performing content for your brand.
Although the insights provided by the native analytics platforms are a good starting point for small businesses, if you’re a medium-sized business or an agency, chances are you’re looking for insights that the native platforms cannot provide. And this is where Socialinsider shines—it can provide you with in-depth content performance analytics on Instagram or Facebook. With it, you can easily see the top content-performing pillars and the engagement they bring.
Based on these granular insights, you can optimize your content strategy.
Advertising basics
If you run ad campaigns or are trying to build your first one, Meta Business Suite is a great place to start.
Start by viewing your previous ad campaigns in the Ads tab on the left menu.

If not, let’s learn the basics of creating an ad campaign.
Creating simple ads
In Meta Business Suite, there are three ways of creating ads — automate your ads, create one from scratch, or turn your Facebook or Instagram content into an ad.
If you choose automated ads, you will answer a series of questions and get a personalized plan.

If you want to boost an existing piece of content, just select the post, set your variables, and publish your ad.
To create an ad from scratch, choose a goal first.

Now for the exciting part — designing your ad. Add an image, headline, and description, customize the CTA button, and include a website URL if needed.

If you want Facebook to fine-tune your ad for each viewer, turn on automatic adjustments. This feature allows the platform to modify aspects like brightness or aspect ratio to improve engagement and effectiveness.
Next, scroll down to define your target audience. You can choose an existing audience or create a new one based on demographics, interests, and behaviors.

After that, select ad placements, set your budget, and determine the duration of your campaign.
Once everything is set, click Publish to submit your ad for review. And that’s it. You’ve just launched your first campaign.
Budget management
Meta allows you to set a daily budget for your ads. It shows you the estimated number of accounts you can reach based on your budget.
The higher your budget and the longer the duration, the higher the reach.
You can start with a small budget and scale up depending on the performance of your ad.
Performance tracking
Go to the All Ads section in the Ads tab. You will find ads categorized by key metrics like views, reach, results, and amount spent.
Monitor the cost-per-result to understand how efficiently your budget is being spent. Also, analyze audience Insights to see who interacts with your ads based on demographics and behavior.
If you want to go one step further, compare organic vs. paid performance to assess how well your paid campaigns complement your overall content strategy. Based on these insights, you can make real-time adjustments to your existing ad campaign.
Team collaboration
One area where Meta Business Suite shines over Meta Business Manager is its collaboration features. Let’s explore them.
- As we saw earlier, you can invite team members to manage your business portfolio. You have the option to give each team member full or partial access to manage things. If you work with a contractor or a freelancer, give them temporary access if required.
- If your business receives a high volume of messages on Instagram and Facebook, Meta Business Suite makes it easier to stay organized by letting you leave private notes on conversations. These private notes can act as internal comments and help your team stay aligned, so anyone jumping into the chat can quickly get context and respond appropriately.

- You can set up approval workflows. As Meta Business Suite supports post drafts and scheduling, one team member can draft content while another reviews or schedules it. And with shared access to the Planner, everyone can see what’s coming up and plan accordingly.
Advanced features and strategies
These features will help you utilize Business Suite to its maximum potential. Let’s explore three of them.
Reporting
You can get reports in Meta Business Suite by exporting your data in PNG, CSV, or PDF formats.
For example, if you want to get a report on audience insights, you need to go to the Audience tab in Insights. Find the export button in the top right and select the format you want.

One caveat? Business Suite does not provide extensive social media reporting features, so you’ll need to download individual reports for different metrics, such as audience insights and content insights.
If you are looking for comprehensive reports, a better option would be a social analytics tools like Socialinsider. For example, I generated a social media audit report for Socialinsider’s Facebook performance. It gave me a 13-page report containing all details like top 3 posts, total engagement, reach, impressions, post distribution, post types, post types sorted by engagement, fans growth, etc.
The best part is I can even schedule auto-reports so my team can get all the data on a regular basis.

Advanced advertising features
Let’s check out three advanced advertising features available to you in Meta Business Suite.
A/B testing
While this option isn’t directly available when creating an ad from scratch, Business Suite allows you to test different versions of your post before turning them into ads.
Go to the A/B testing option in the Content menu.
Click Create A/B test. You can choose to test up to 4 versions of the content.

Depending on the results, you can boost this content and turn it into an ad.
Alternatively, you can go to Meta Ads Manager, which offers built-in split testing tools.
Set custom audiences
Do you want to target people with a specific education level or in a specific industry?
You can set these preferences easily in Meta. Here’s how to do it.
- While you’re creating an ad, scroll down to the Audience section and click on Create New.

- A new pop-up will open. Scroll down till you find the Detailed targeting option. Click on Browse.

- You can add different demographics, interests, and behavior attributes here.

- Once selected, click on Save audience.
This will help you target specific sets of people, increasing your conversion rates.
Pixel integration
Meta Business Suite does not have a dedicated Pixel setup tool, but you can still integrate Meta Pixel by linking it through Meta Events Manager. Here’s how.
- Go to Meta Events Manager and click Connect data sources.
- Select Web and then choose Meta Pixel as your data source.
- Enter your Pixel Name and Website URL, then click Create Pixel.
- Follow the setup instructions to install the Pixel on your website using manual code installation or a partner integration.
- Once installed, verify that the Pixel is working using the Pixel Helper extension or the Test Events tool in Events Manager.
- After integration, you can track conversions, optimize ads, and retarget visitors within Meta Business Suite’s Ad Tools and Insights.
While the setup happens in Events Manager, the performance data and retargeting options can be accessed through Meta Business Suite, allowing you to manage everything in one place.
Automation and time-saving tools
Once you are done with everything, it’s time to find out how you can save time with Meta Business Suite. Here are three ways we use it to automate things.
Automate responses
While we have already seen that you can automate responses to DMs, you can even create custom automations for your business.
Go to Inbox > Automations and click on Create Automation.
If you can’t find the option you want, click on Start from scratch.

You can set your own conditions and subsequent actions. For example, if you receive frequent inquiries about your store hours, you can create an automation that detects messages containing “What are your hours?” and automatically responds with your business’s operating times.

Once done, click on Save changes.
Recycle content
Do you want to repost your top-performing content? Instead of spending time finding these posts, go to the Content tab in the left menu. You will see the posts getting the most reach at the top.
Click on that post. Find the ellipsis button and choose Duplicate post.

You can now change the caption, picture, or schedule the post as it is.
If you run some recurring promotions or announcements, use the Planner to schedule this repeated content. This way, you don’t have to worry about manually posting each time.
Integrate with other tools
You can integrate your Facebook page with apps that will help run your business smoothly.
Go to All tools in the left sidebar and find Business apps in the Manage section.

Whether you want your users to schedule appointments easily or offer a streamlined shipping experience, you will find many relevant tools.
Just click on the tool of your choice and follow the step-by-step instructions.
Mobile-specific features
Now that we already know how to use Meta Business Suite, here’s a breakdown of the features and navigation differences on both iOS and Android.
iOS and Android app guide
Meta Business Suite’s mobile app is built for convenience and on-the-go management, which is why the desktop version is more feature-rich.
You can download the iOS version from this link or by going to the App Store and searching for Meta Business Suite.
If you’re on an Android-supported device, here’s the link or search for the app on Google Playstore.
Once the app is downloaded, all you need to do is enter your credentials and get started.
While you can utilize all the basic features, such as boosting posts, checking performance, scheduling posts, replying to messages, and getting real-time alerts, there are a few features that are better to use on the desktop.
- Full ad creation & management: You can boost posts, but detailed ad targeting, split testing, and campaign management require access from desktop.
- Advanced audience targeting: Creating custom or lookalike audiences is limited in the app.
- Detailed insights & reports: You get basic Instagram and Facebook analytics, but in-depth performance reports and data exports are only available on desktop.
- File manager access: The media library for organizing and reusing content is not available on mobile.
- Assigning notes and labels to DMs: While you can assign conversations to specific people on the team, labeling and leaving notes is still not possible
- Automations & custom responses: Setting up custom automations for messages is mainly a desktop feature.
Meta Business Suite limitations and workarounds
Although we’ve touched on a few limitations already, here’s a quick rundown of common roadblocks you might face in Meta Business Suite (along with practical ways to work around them)
Common troubleshooting in Meta Business Suite
Here are some typical issues users face in Meta Business Suite and how to address them.
- Account connection issues. Sometimes, Facebook or Instagram accounts may disconnect from Meta Business Suite. This can happen due to password changes, permission revocations, or platform glitches.
To fix it, go to Settings and then Accounts, and reconnect your accounts. Make sure you have admin access on all platforms you’re linking.
- Publishing errors. Posts may fail to publish due to incorrect formatting, policy violations, or expired access tokens.
To fix it, double-check your content for any flagged words or broken links. Reconnect your account if needed, and try reposting. Also, ensure scheduled times are not in the past.
- Analytics Discrepancies. You may notice that certain social media metrics in Meta Business Suite differ from those in Ads Manager or Instagram’s native app.
To fix it, give the system time to sync, as data may update with a delay. For high-accuracy campaign data, use Meta Ads Manager or export metrics for external analysis.
- Permission Problems. Users may be unable to access certain pages, assets, or features due to incorrect role assignments.
To fix it, go to Settings > Users > People and review user roles. Ensure team members are granted the appropriate permissions for Pages, ad accounts, or Instagram profiles.
Meta Business Suite alternative
Looking for a tool that does more than just help you post? If you want a platform that guides every stage of your content strategy with deep, actionable insights, Meta Business Suite might not check all the boxes. And while we might be a bit biased, here are three strong reasons why Socialinsider is a powerful alternative when it comes to making data-driven decisions.
Gives you cross-channel analysis
Many clients shift from Meta to Socialinsider because they can get data on all their social platforms on one dashboard. Brands just have to connect their profiles, select the pages they need, and set up their one-stop dashboard.
You get a unified view of insights across all your social platforms in one place.

This cross-channel functionality enables you to:
- Generate aggregated reports that combine metrics across all social platforms
- View breakdowns within charts based on social channels
- Compare brands as a whole instead of individual platform profiles
- Access key metrics, top content pillars, followers, posts, engagement, impressions, and video views in one consolidated view
This feature is particularly useful for bi-weekly reporting to track how a brand is progressing across all channels. The reports can be downloaded in PDF, PowerPoint, or Excel formats, and you can schedule automated reports to be sent regularly.
For agencies managing multiple clients, you can organize projects by client and create brand reports that consolidate all their social media presence.
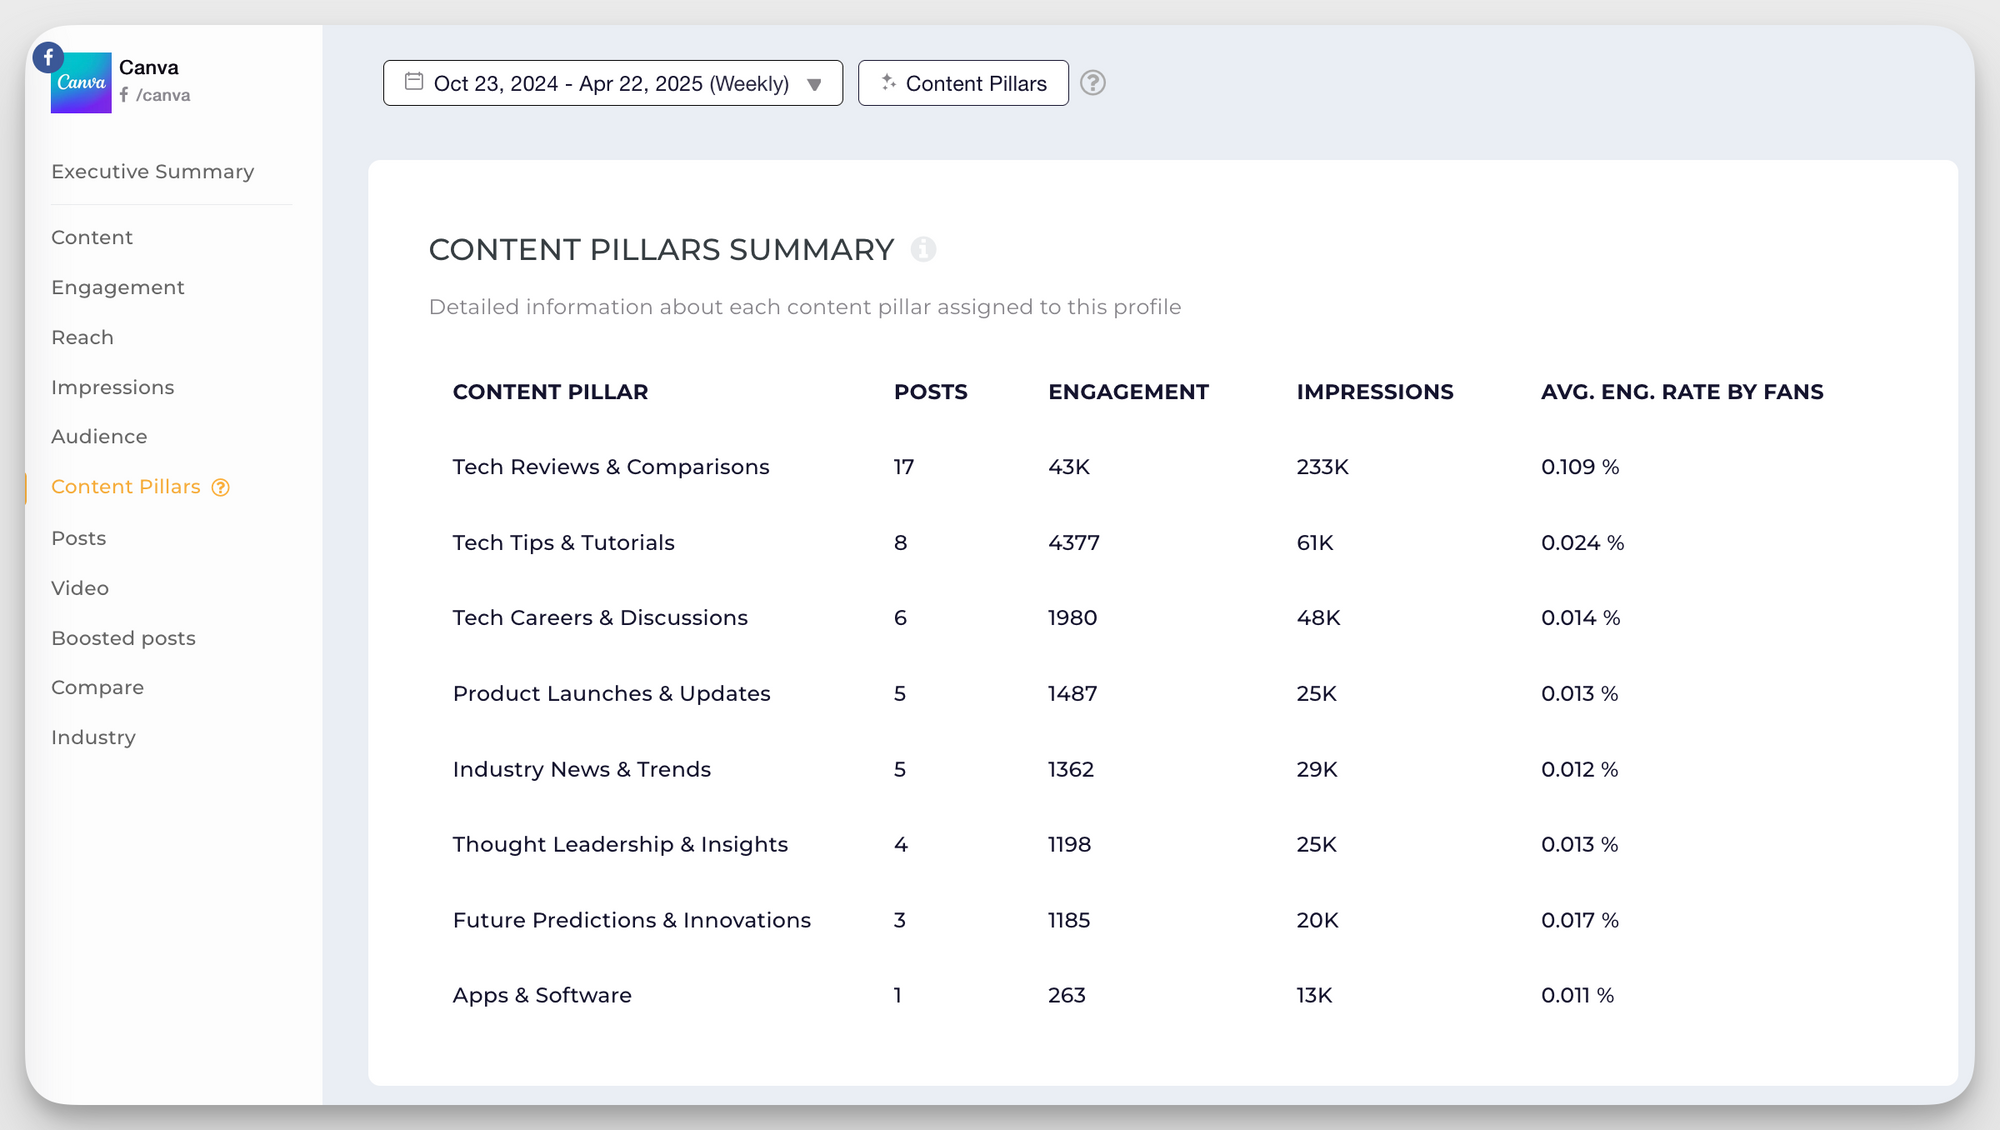
Discover content pillars
Content pillars are a feature that categorizes posts based on their content themes. They help users understand how content is distributed within brand strategies and which types of content drive engagement.
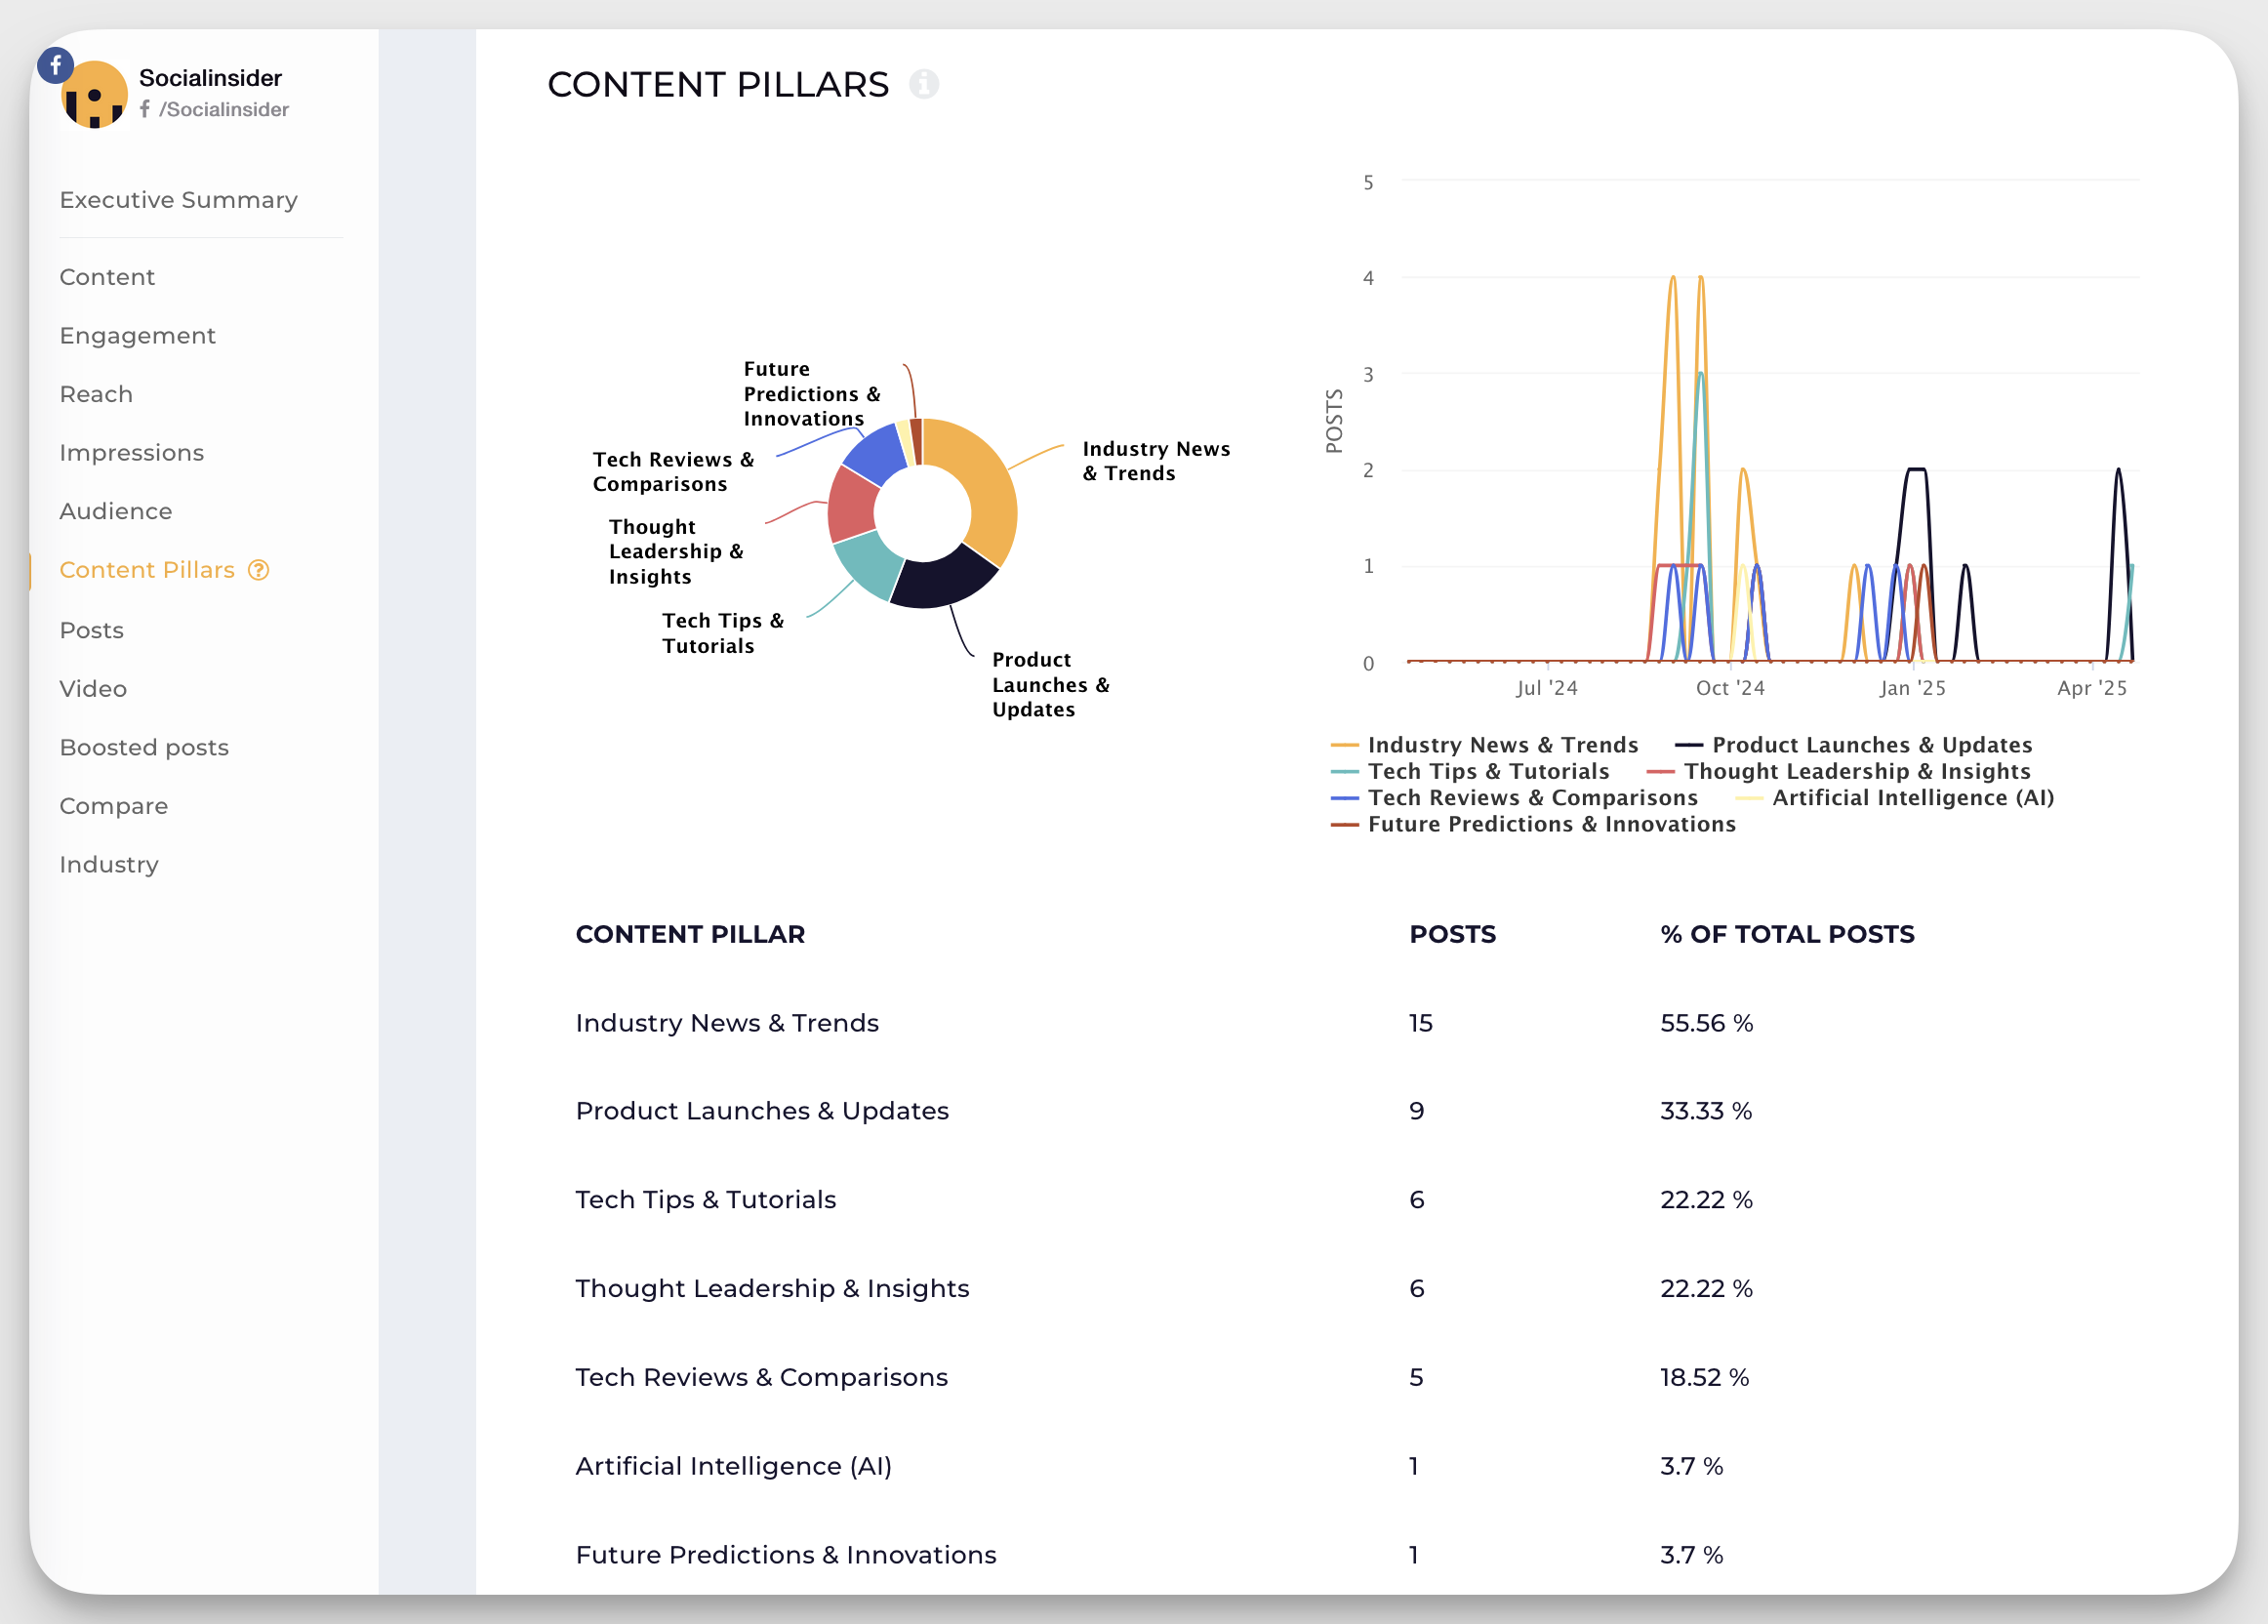
You can see two types of content pillars in Socialinsider:
- AI-generated content pillars: Automatically assigned based on the industry of a profile. Each industry has up to 10 predefined content pillars (e.g., vehicle showcases, special offers, market research).
- Custom content pillars: Users can create their own content pillars by manually tagging posts or setting up auto-tagging based on keywords or search queries.
Content pillars provide valuable insights by showing:
- Post distribution across different content themes
- Engagement metrics for each content pillar
- Which content types perform best
For example, a car company might discover that vehicle showcase posts drive 94% of their total engagement, indicating what content they should focus on.
This feature is particularly useful for optimizing content strategy based on performance data.
Get competitive and comparative insights
You can see how your brand performs compared to your past performance and others in your industry.
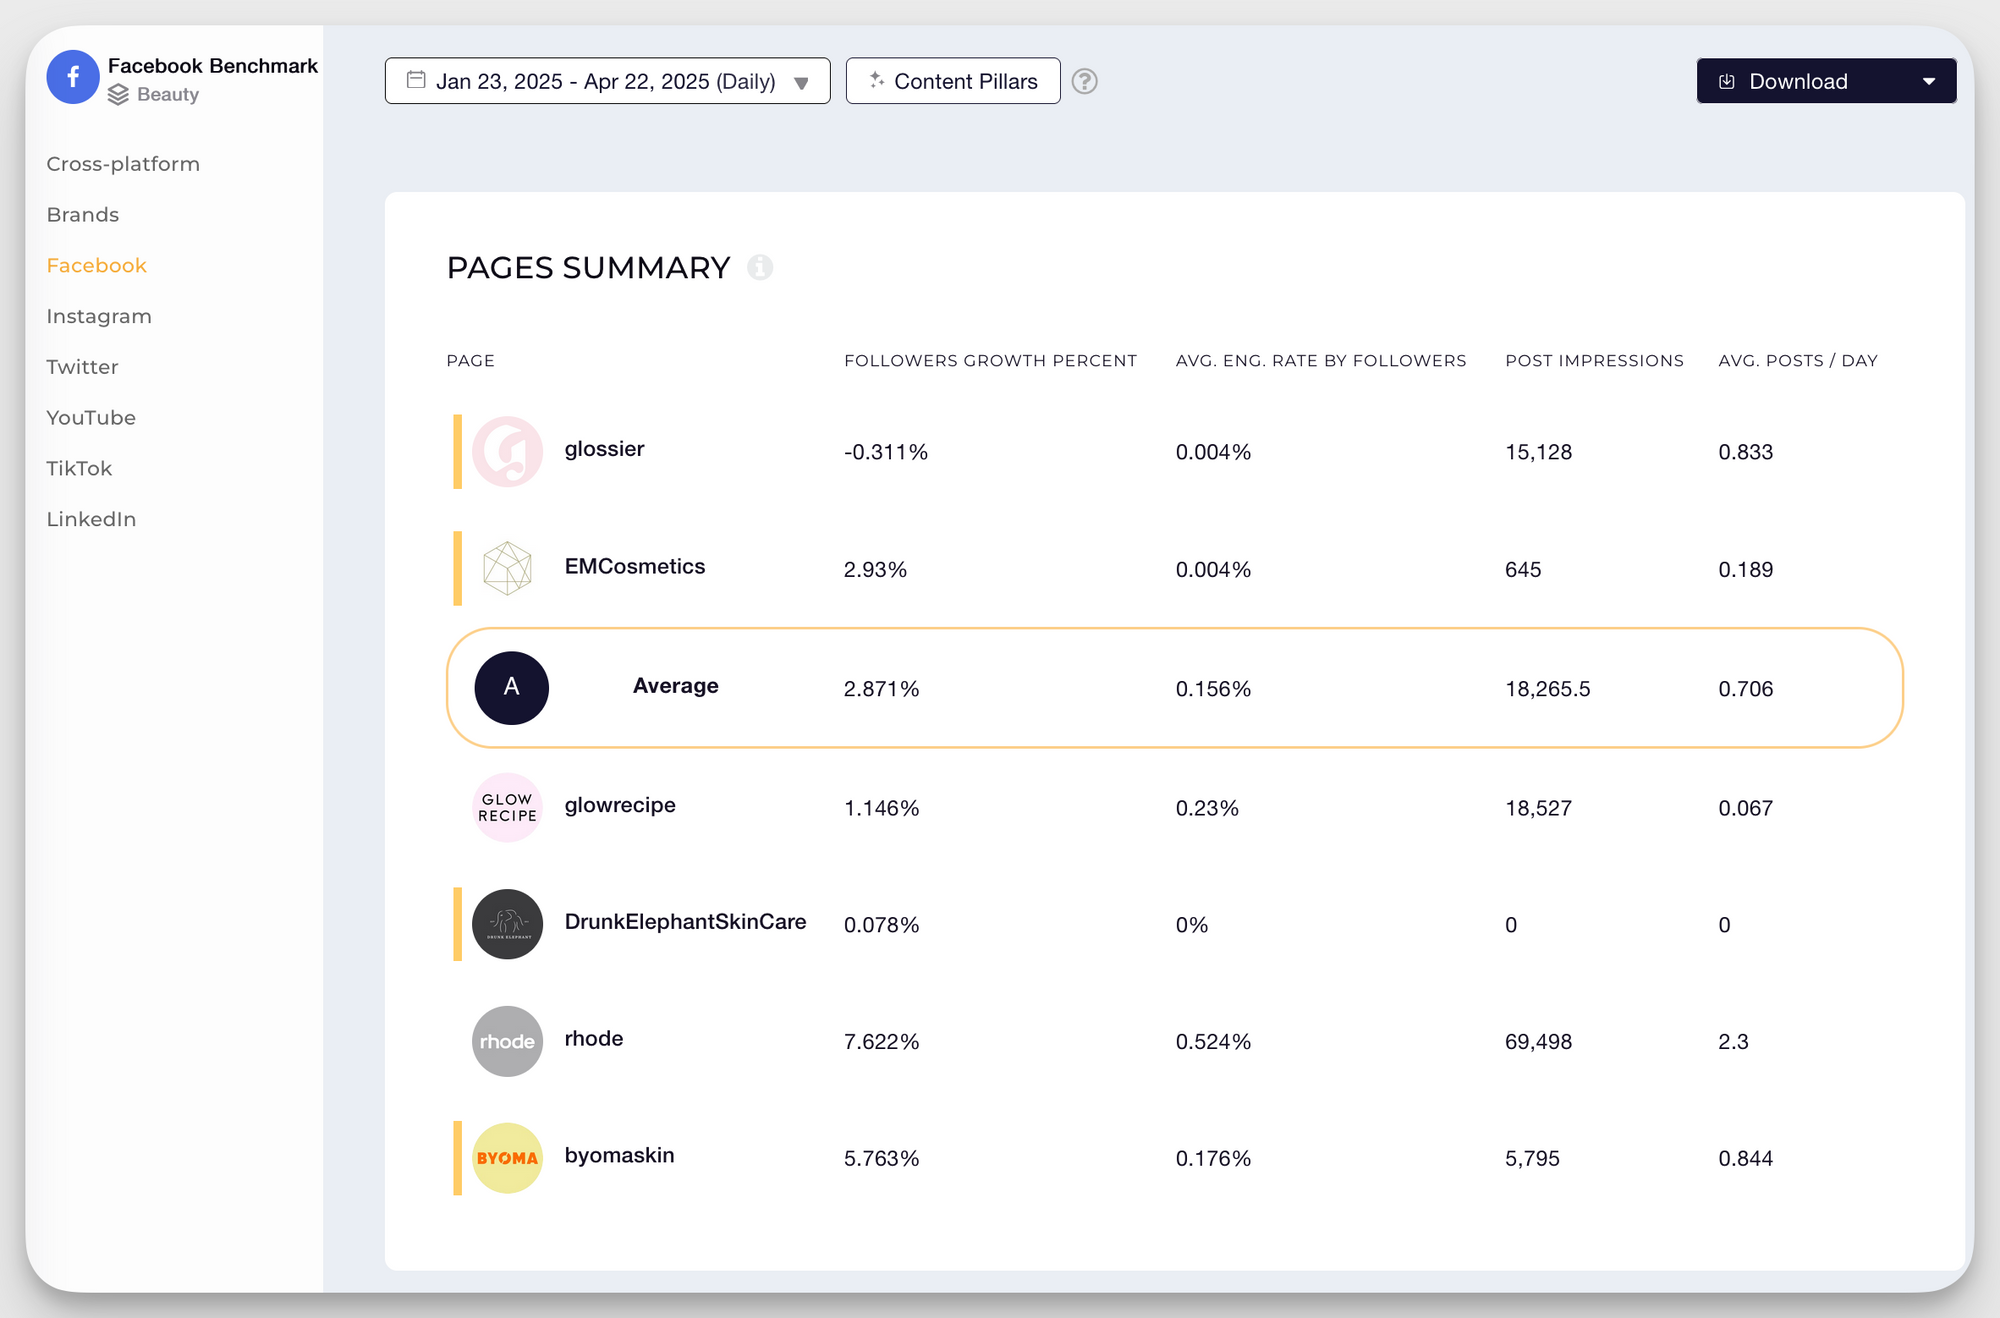
Here’s what you can do using our tool:
- Benchmark against competitors. Run a competitor analysis to track and compare your social performance, like engagement rate, follower growth, and post frequency, against competitors, industry leaders, or market averages.
- Conduct a side-by-side profile analysis. You can analyze multiple brand profiles (including competitors’) side-by-side to see what kind of content performs best, how often they post, and how their audience reacts.
- Compare audience engagement. See how engaged your audience is compared to others in your space. Find out which brands are driving the most conversations and why.
- Get content strategy insights. Understand what types of posts, formats, or hashtags work for competitors so you can refine or pivot your own strategy with data-backed decisions.
Want to see how these features work for your brand?
Final thoughts
Meta Business Suite is a great tool if you’re just starting your social media journey and are mainly active on only two platforms — Instagram and Facebook.
You can follow the step-by-step process and set things up, be it automations or post scheduling.
But if you are looking for a comprehensive tool that helps you gain insights across all platforms—Instagram, Facebook, LinkedIn, TikTok, and X, consider investing in a more robust tool like Socialinsider.
Meta Business Suite FAQs
1. What is Meta Business Suite, and how do you use it?
Meta Business Suite is a tool by Meta that helps you manage your Facebook, Instagram, and Messenger accounts in one place. You can schedule posts, reply to messages, run ads, and track performance metrics. You can use it by downloading the app on your mobile or accessing its web app on your desktop.
2. How do I enable Meta Business Suite on Facebook?
To access Meta Business Suite, log in to your Facebook account associated with your business. If you’re eligible, you’ll automatically be redirected to Business Suite upon login. Alternatively, visit business.facebook.com directly. Ensure you have a Facebook Page for your business to utilize this tool.
3. Can you use Meta Business Suite without a Facebook page?
No, you can’t use Meta Business Suite without a Facebook Page. It’s designed for managing business activity across Facebook and Instagram, and a Facebook Page is required to access its tools.
4. How much does it cost to use Meta Business Suite?
Meta Business Suite is free to use. You do not need to pay to utilize any of its features.
5. Does Meta Business Suite have support?
Yes, Meta Business Suite provides support through the Meta Business Help Center, which offers resources on topics like troubleshooting, account management, and content monetization. Additionally, businesses that have completed the verification process can access Meta Verified Support for assistance with account issues. Support options may vary based on your business’s verification status and location.
Nidhi Parikh
Nidhi Parikh is SaaS writer that believes scrolling through social media is research for work. When not working, find her binge watching the latest series or reading anything she can get her hands on.

Know what your competitors do — before your manager asks
Get instant social benchmarks & reports without manual work.
You might also like


Improve your social media strategy with Socialinsider!
Use in-depth data to measure your social accounts’ performance, analyze competitors, and gain insights to improve your strategy.